Progress marches steadily on with my checklist of things I need to be able to play Rangers of Shadow Deep, this time furnishing me with some trees:
I wanted some proper old school bottle brush looking trees, and so inspired by one of the Luke’s APS YouTube videos set about making some of my own!
[brief side note - although in this post it will look like I knocked these out in short order, these pictures cover an eleven month span!]
Back in the early days of the original pandemic lockdown, I ordered some gutter guard on eBay - cost about a tenner, and came with enough to make plenty of trees whilst still having enough to still use on my gutters if I so choose:
I cut out some bases using the same thin board that was liberated from a skip at some point in the distant past:
This actually took ages to do, as I cut out a dozen circles using knives. I recently discovered that I can just cut the board using scissors in a fraction of the time, which would have turned this into a ten minute job rather than several sessions over several days!
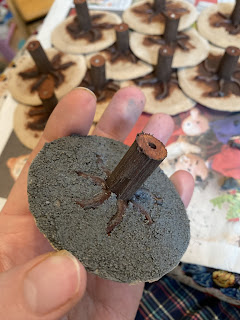
After bevelling the edges, I cut some trunks out of rod (textured with a variety of knives and wire brushes to look more like bark) and hot glued them onto the bases, then made some hot glue roots as per the video that inspired all this. I used a dremel attachment that I’d never used before to drill holes in the trunks to later take the bodies of the trees, which was a bit nerve wracking!
Thankfully I didn’t injure myself or any of the furniture, and with a quick sweep up of the sawdust now coating everything in the front room my wife was none the wiser by the time she got home.
I basecoated the trees using acrylics rather than model paint, because model paint is expensive. It didn’t cover the hot glue roots particularly well, but I wasn’t overly mad about that as I knew it would be getting plenty of drybrushing which would hopefully cover any wonky looking bits.
At this point in our story, four months have passed, and it’s now my birthday at the end of August. Finding myself with some free time while my wife makes brisket (continuing the now tradition of having a garbage plate of a selection of tasty things for my birthday dinner), I decided to make up some ground texture to use on the tree bases.
I mean everyone has a tub of sieved sand in their house right? All of this was globbed together to make what is essentially very bumpy grey filler, which was then globbed onto the bases and poked into all the nooks and crannies between roots with a broken coffee stirrer.
I’d pre-coloured the filler mix so that I wouldn’t have to base coat it and could just paint over the top of it. Normally I’d prime something like this for an even colour (as well as helping to stick the sand down even more) but I figured that the filler would do a fine job of keeping everything together.
The bases got the usual washes and dry brushes that ground cover gets, and were finished off with some flock and static grass to make them look a little more lively:
Fun fact - when you’re sticking on sparse patches like this, do an odd number and it looks more natural. Every now and then I’d accidentally do four patches of grass on a base and it would just look... weird, unnatural.
More time passes.
We’re now in another lockdown, and I double down to try and crack through my list of things I need to complete before I can play a solo wargame (interesting aside - a buddy and I often discuss these sort of self imposed targets, and how some people just really want to play the game so play with paper cut outs, whereas we set ourselves these targets and don’t end up actually playing, but that might be a longer discussion for another time...) and I pull the gutter guard out of the basement. Where it’s been coiled up for so long, it’s no longer looking as bottle brush round as it once did:
I take to the internet for advice, and try various methods of heating it up and reshaping it, but none work particularly effectively so I go with the advice given by Luke of Luke’s APS:
So I figured I’d crack on regardless. Word to the wise - cutting through the twisted wire core of the gutter guard takes a whole lot of squeezing, so be prepared for some hand ache!
Using a pair of long bladed scissors, I set about trimming the gutter guard down into tree like shapes. If you try and do this at home, make sure you put something down to catch your trimmings - I tried to vacuum them up off the rug and the plastic just did not get picked up at all, leaving me having to scrub it up with a brush and pick individual bits out of the rug with my fingers...
Pictured in the foreground, the offending fibers:
I’ve kept a baggie of these just in case, because most wargamers are terrible packrats. You could probably use them for a nice thatch effect...
Some cutting later, I had a scrap polystyrene forest porcupine:
I gave them a spray of nato green to cover the metallic wire core, and also so that any areas that showed through the flock wouldn’t be jarringly black.
Other learnings - if it’s raining and you try to turn your downstairs toilet into a sneaky spray booth, just opening the little window in there isn’t enough...
Then it was just a case of flocking the trees - I filled a spray bottle with diluted PVA (with a little splash of washing up liquid) and set about dousing the trees and sprinkling on the homemade flock
from a previous post:
I then gave them another good soaking of sticky water and left them to dry in the conservatory:
Once this is dry, a few of the trees that I thought would look better flocked have not in fact been miraculously saved by the process, so I gave them a bit of a trim. There are also some areas where some unflocked branches are poking out, which I also take this opportunity to prune:
The flock was still coming off more than I’d like, so I wanted to seal them further. Unfortunately, the only varnish I had in the house was satin rather than matt, so I again took to the internet. Apparently model railroaders have used hairspray for years, and I had some in the basement already so decided to give it a whirl. It didn’t do a great deal to seal the trees.
Additional learnings - just because hairspray doesn’t state that it’s scented doesn’t by default mean that it’s unscented, a lesson I learnt the hard way. Also, don’t spray in the conservatory where you’ve got some cans of beer chilling unless you want a fruity surprise when you later drink one...
My wife had to go to Poundland to get some bits, so I asked her if she could check for Matt varnish there, having seen some people mention getting it from there. Our local branch however isn’t one that has Matt varnish, although she did get me a pot of gloss yacht varnish (which I was tempted to try mixing into my diluted PVA to add some toughness but didn’t in the end for fear of ruining everything and not being able to undo it) and a can of spray adhesive, which I tentatively tested on one of the trees but unfortunately rather than coming out as a fine mist shot ropes of glue like silly string, so one of the trees is noticeably chonkier than the others after I tried to hide that with additional flock!
I then doused them in watered down PVA again, hoping that this would be the step that sealed them once and for all.
Once this has dried though, they were still leaking flock like a bucket with a hole in, and I figured I’d just base them up and be done with it!
A glob of hot glue in each trunk affixed them securely, and we were done bar sweeping up the flock now all over the table.
They also conveniently fit exactly into one of the drawers on the unit I currently have my finished terrain in:
So, on the one hand overall they didn’t come out quite how I’d hoped, but on the other hand they are so much better than the trees I had before (which was in fact zero trees). Plus, one step closer to playing a game (which with any luck will be before I have to go back to work)
Mystery additional structureTrees- Cart
- Well
- Woodpile
- Crates and barrels
- a playing surface!
- Treasure tokens
In unrelated news, I’ve been looking at a blister of Bishoujo Senshi from Rezolution on eBay for a while, pondering whether I should just treat myself and buy it after mentioning them in my plans for the Cyberpunk project iirc. I didn’t end up buying them in the end. Which is probably a good thing as look what I found in the drawer I cleared out to make space for the trees:
Apparently I bought a blister of them already, potentially a decade ago, and forgot! I think it’s actually the Yuurei that I still wanted, but I’d misremembered the name...


