So, happy to divert myself from what I was supposed to be doing for any number of other projects, inset about building myself a pool to use for Frostgrave.
And here it is.
I started out rooting around in my boxes of useful bits (which I really need to reduce, as there’s an almost comical amount of old polystyrene and bits of plastic packaging down in the basement now) and found a bit of plastic pipe that I’m fairly certain I scavenged from work when we had a plumber in. It was cut fairly unevenly, so I measured it round and corrected that with a mix of clipping and sanding:
Just like all my terrain, it got a base from the mystery board that I rescued from a skip at work (starting to sense a pattern here):
And then began the process of adding bricks!
I’ve still got a load left over from when I overestimated how many I’d need to gussy up some modern ruins. They’re fairly roughly cut, but I think this variation just adds to the effect. I used tweezers to dip each brick individually in a bowl of glue before applying it to the pipe:
And here it is partway done, checking scale with the nearest mini:
I guess if it was a pool designed for people to drink from it would probably be a lot lower, but I also wanted it to be a piece of blocking terrain, so it’s a bit taller than would perhaps be ‘realistic’ (he says, discussing the logistics of a magic pool in an imaginary magic city).
Once the outside was done, I considered how to finish the inside. I could have thrown some plaster in there and painted it up like dirt/mud, but in the end decided to brick it that side too:
Et voila:
To hide the remaining visible bits of the pipe, I cut some rough capstones to make a lip:
And that was building complete. When using cork, if you don’t protect it in some way it can easily rip and dent during painting if you drybrush a bit roughly, so I dug out my old faithful cheap superglue from Poundland.
Then it was into painting, which apparently I didn’t take any WIP pics of. The stones for the same treatment as all of my ruins, while the pool got a dark blue base. I tried flicking white paint onto it from a brushes bristles to try and create the illusion of reflected stars, but that didn’t go well at all so I got a bit more creative (there was some finger painting involved):
For the water, I decided I wanted to try some water effect for the first time. My wife has a resin kit she’s been planning on trying out, but we haven’t yet found any time where the children wouldn’t poke their fingers into it to try it. Then I remembered that I have a pot of yacht varnish (which I’m fairly sure my wife bought during one of the lockdowns as the ship didn’t have what I was actually after) and I figured I’d give that a go, as if it didn’t end up looking like realistic water, that was probably still fine, as I could handwave it as magic! So I poured in a thin layer, and waited:
Now it turns out that my idea of what constitutes a thin layer and what the universe does varies somewhat, and I’d poured it too thick. The top cured fine, but it was still very squishy underneath. Oh well, I though, I’ll wait a little longer. And then I accidentally left it on a surface with a very slight slope:
The wrinkly set in it, but underneath was still very squishy. Turning to google, it turns out that varnish doesn’t just cure with time, but with contact with oxygen. Not a problem, I thought, I’ll pop some pinholes in the surface layer to let some oxygen in, cure the bottom, then cover up anything that looks a bit wonky with further layers of varnish - and with a bit of luck, any pin pricks will just look like bubbles!
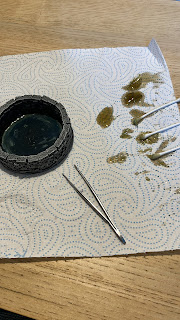
Obviously this didn’t work, and as soon as I put the holes in the surface layer it started ballooning up, and I decided to peel the whole thing out:
Having removed the surface layer and scraped any odd chunks out of the edges, I then left the thin layer that remained to cure:
And it did! Over the course of a couple of weeks I then applied very, very thin layers, until it built up to a level that I was happy with (lower than I’d originally planned, but at this point I didn’t want it to go wrong again) and it looked like this:
Result!
So, what did I learn? Thin layers, mostly. The varnish dried slightly yellow, but I think if I’m painting on thin layers that would probably be fine when making a pool or a river rather than necessarily going out and getting a ‘proper’ water effect…


Well this was clearly a bit of a struggle, but the end result looks first-rate!! I must paint up the well I bought for Frostgrave v.2, and this posting has certainly inspired me to do so. Great stuff.
ReplyDeleteExcellent looking well you've created.
ReplyDeleteIt looks great.
ReplyDeleteYour struggle with yacht varnish confirms my opinion that it is best left to the yachtsmen. I find polyurethane varnish much better for this hobby as it dries in a reasonable time and gives a glass like finish.
For all the work the end result is very nice mate. Especially love the choice of adding bricks to the inside as well as outside of the pool.
ReplyDelete