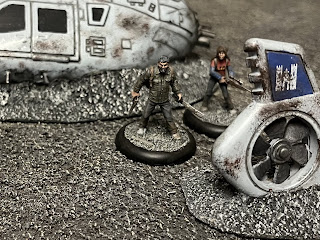
For the first scenario in my Last Days campaign, I decided that I needed to model a crashed helicopter, as the sort of thing that a newly formed group of survivors might find themselves investigating whilst searching for supplies in the early days of the zombie apocalypse.
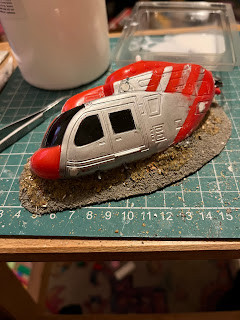
Handily, I already had a toy helicopter that I’d cut in half:
This was bought from the poundshop so long ago that it actually only cost a pound. Showing how long I’ve had this for, when I cut out a chunk to make it look slightly buried in the ground, I found that past me had used rizla packet to cover some holes, and I’ve not been a smoker for at least twelve years, suggesting that this broken toy has moved house with me at least three times:
On the other hand, it’s proof to my wife that I will eventually get round to finishing of all those half-finished projects.
So, having cut and sanded away a chunk of the undercarriage, I mounted it to a base cut from my usual scrap board:
and then started building up some ground around it using chunks of cork.
To further build up the ground, to make it look like the crashing helicopter ploughed into the ground rather than just sitting flat atop it, I built up around the helicopter with some filler:
Many years ago when I first chopped this toy in half, I’d put some tube and sprue into the tail piece, to make it look like some internal structures existed that had snapped in the crash, so now I needed to do the same with the hole in the main body of the helicopter.
The helicopter’s tail got it’s own base, and had the ground level around it built up more on one side than the other to make it look like it had slid along as it buried itself in the ground:
Once I was happy with how that looked, it was onto detailing! Being a toy, there were a number of screw holes that needed filling - where there was only a void behind some holes, I glued in a little chunk of cork first to give the filler something to butt up against. I wasn’t overly fussed about getting a smooth finish on these cover-ups, as I figured that since I was making a wreck any imperfections would only add to the overall effect once I got to the weathering stage.
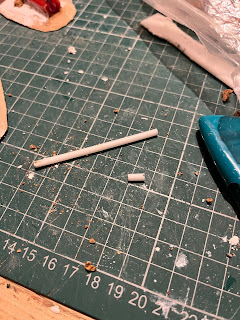
Fun fact - lollies don’t come with plastic tubes as their sticks any more, instead coming on a paper stick that is no use when you’re trying to make a miniature tube. Handily, being a terrible pack rat like most wargamers, I had one of the old style ones from at least a decade ago still:
Which turned out looking alright, so I was pleasantly surprised.
Which I used to make some broken pipes and a broken rotor housing (as the toy rotor blades had apparently disappeared at some point in the distant past, I figured they’d likely have sheared off in the crash so I could get away with just having a damaged housing for them rather than having to carve some replacements out of plasticard).
I also added some plastic girder (that came with a Fenris Games kit) and distressed some sprue with a pair of pliers to give a suitably mechanical appearance.
Speaking of things that had gone missing at some point, the ski foot thing on the helicopter was also nowhere to be found, so I bent up some leftover model spearshafts to make it look like the legs had bent and snapped in the crash:
Fun fact, after finishing this project I found the exact same part from one of my son’s toy helicopters that I could have scavenged for this if only I’d found it a day earlier, but isn’t that always the way.
Building complete, I slathered the base on my usual textured paint (which is going surprisingly well considering I made it a couple of years ago and it’s been living in a sauce pot ever since), and then once that was dry went back over the piece adding sand and stones to give greater depth and texture:
Then it was time for painting! Big brushes and a simple colour scheme was the plan here, as I knew I was going to weather the bejesus out of it. As there was a lot of deep lined detail on the toy, I figured I go and panel line it as if it was a proper model kit:
I opted for a pale bluey grey, as I figured it was generic enough that I might be able to use this terrain piece more than once, and painted the panel on the tail blue to give it a little pop of colour. I also added a transfer from an old Bretonnian transfer sheet, which has got huge mileage over the years providing me with a variety of generic items and patterns that I’ve used on pretty much everything other than what they were originally intended for.
Then it was a case of weathering, weathering and more weathering! Silver brown and black in various amounts combine to make it look like this crash was a real doozy (even if realistically a crash like this would likely have a few scrapes if it had landed relatively intact, but allow me some artistic license):
And voila, that’s it ready for my survivors to scavenge for supplies!


Simple and effective.
ReplyDeleteFantastic work! It looks wonderfully realistic and shows what's possible with cheap toys.
ReplyDeleteNow that's a cool way to use an old toy. Lovely job mate.
ReplyDeleteI love it when you can get a new purpose for an old piece like that. Cool results, I love what you got!
ReplyDeleteVery nice! A simple and thrifty, but appealing project.
ReplyDeleteGreat looking piece of scenery
ReplyDeleteThis is really cool! It's a very nice piece of terrain.
ReplyDelete