

Here are some buildings that I’ve prepared to be able to play the first Rangers of Shadow Deep scenario (pictured here in the garden, to take advantage of the brief appearance of natural light today - although admittedly it's nearly midnight as I type this, so potentially yesterday by the time you read this!).
I knew that I had a Perry plastic building tucked away awaiting building - word of advice, don't get distracted messaging a friend about how productive you're being and accidentally glue one of the walls on upside down:

(don't worry, I noticed soon enough to be able to fix it before the glue dried!)
but knew that I'd need more than just the one building, so set about digging out the raw materials to make some of my own:

Making everything from scratch is all well and good, but these were planned as a quick project to get playing as soon as possible (although admittedly, I only finished them four months later, but that's neither here nor there), so I decided to take the shortcut route and essentially decorate a pre-made box to cut some corners:

A box of fruit tea was the basis for my house, and an oxo cube box was the basis of my smaller shack.
Ordinarily, I'd have used that much beloved crafting material of coffee stirrers, but unfortunately we were mid pandemic lockdown, and so I didn't have ready access to any bar the half a dozen or so I already had in the house, which I knew wouldn't be enough. By a stroke of luck, I discovered that I did in fact have a bag full of tongue depressors, which it turned out were about three times the width of a coffee stirrer, and so I was able to (with somewhat mind numbing repetitiveness) cut down some suitable replacements:

Then it was just a case of sticking bits to the boxes to make them look like little houses!

I spent some time looking at various different styles of medieval houses on Pinterest for inspiration, but rather than slavishly striving for realism largely winged it.

I decided that I wanted the shack to be completely timber, rather than just being a smaller version of the main house, and had great fun putting in wonky and broken slats to give it a real ramshackle look.

After placing my first few timbers, I realised that something was missing, and that despite actually being made of wood, my beams just didn't look... wooden! So I set about adding more steps to the process, individually weathering each beam with a wire brush, knife and files to give it some texture that I hoped would later lend itself to drybrushing.

I also added some windows using trimmed down pieces of matchstick:

For the roof, I fell back on my secondary school education and knocked up a net (complete with attachment tabs):

And who says you never use anything you learned in school? Apparently I didn't take any more pictures of these steps, but despite the lack of step by step evidence I added some braces to keep it vaguely straight, glued on the roof, and decorated the sides with more faux coffee stirrers to match the rest of the house:

Now, the thatch! Many years ago, I picked up an offcut of fake fur whilst trailing round after my wife in a fabric shop (although this was so long ago that she was potentially only my fiancée or girlfriend at this point) which I then dutifully stored away waiting for the right time to use it.

I carefully measured and cut out my fur, before attaching it to the existing cardboard rooves of my miniature buildings:

Brief side note - it was at this stage that I allowed some realism to creep into the project, and figured that the roof on the shack should probably be angled to allow rain to run off of it, rather than a flat roof that would probably pool water and rot the thatch, so I knocked up a shallow angle using more faux coffee stirrers:

At this point, having never made teddy bear fur thatch before, I had some concerns that I was about to ruin everything that I'd achieved thus far, so spent some time trawling various blogs and tutorials to prepare myself as best as I could. The sum total knowledge I gained was pretty much 'douse it in glue, shape it, let it dry', so I cracked on. (Also, re-reading this before posting, I seem to have neglected to mention that I textured the walls by carefully stippling filler on between the beams, so I'll just tuck this here!)
Here they are before their sticky bath:

(with 'Zoey's Extraordinary Playlist' playing in the background, which reminds me that I don't think we ever watched the last episode while it was still available...)
and after:
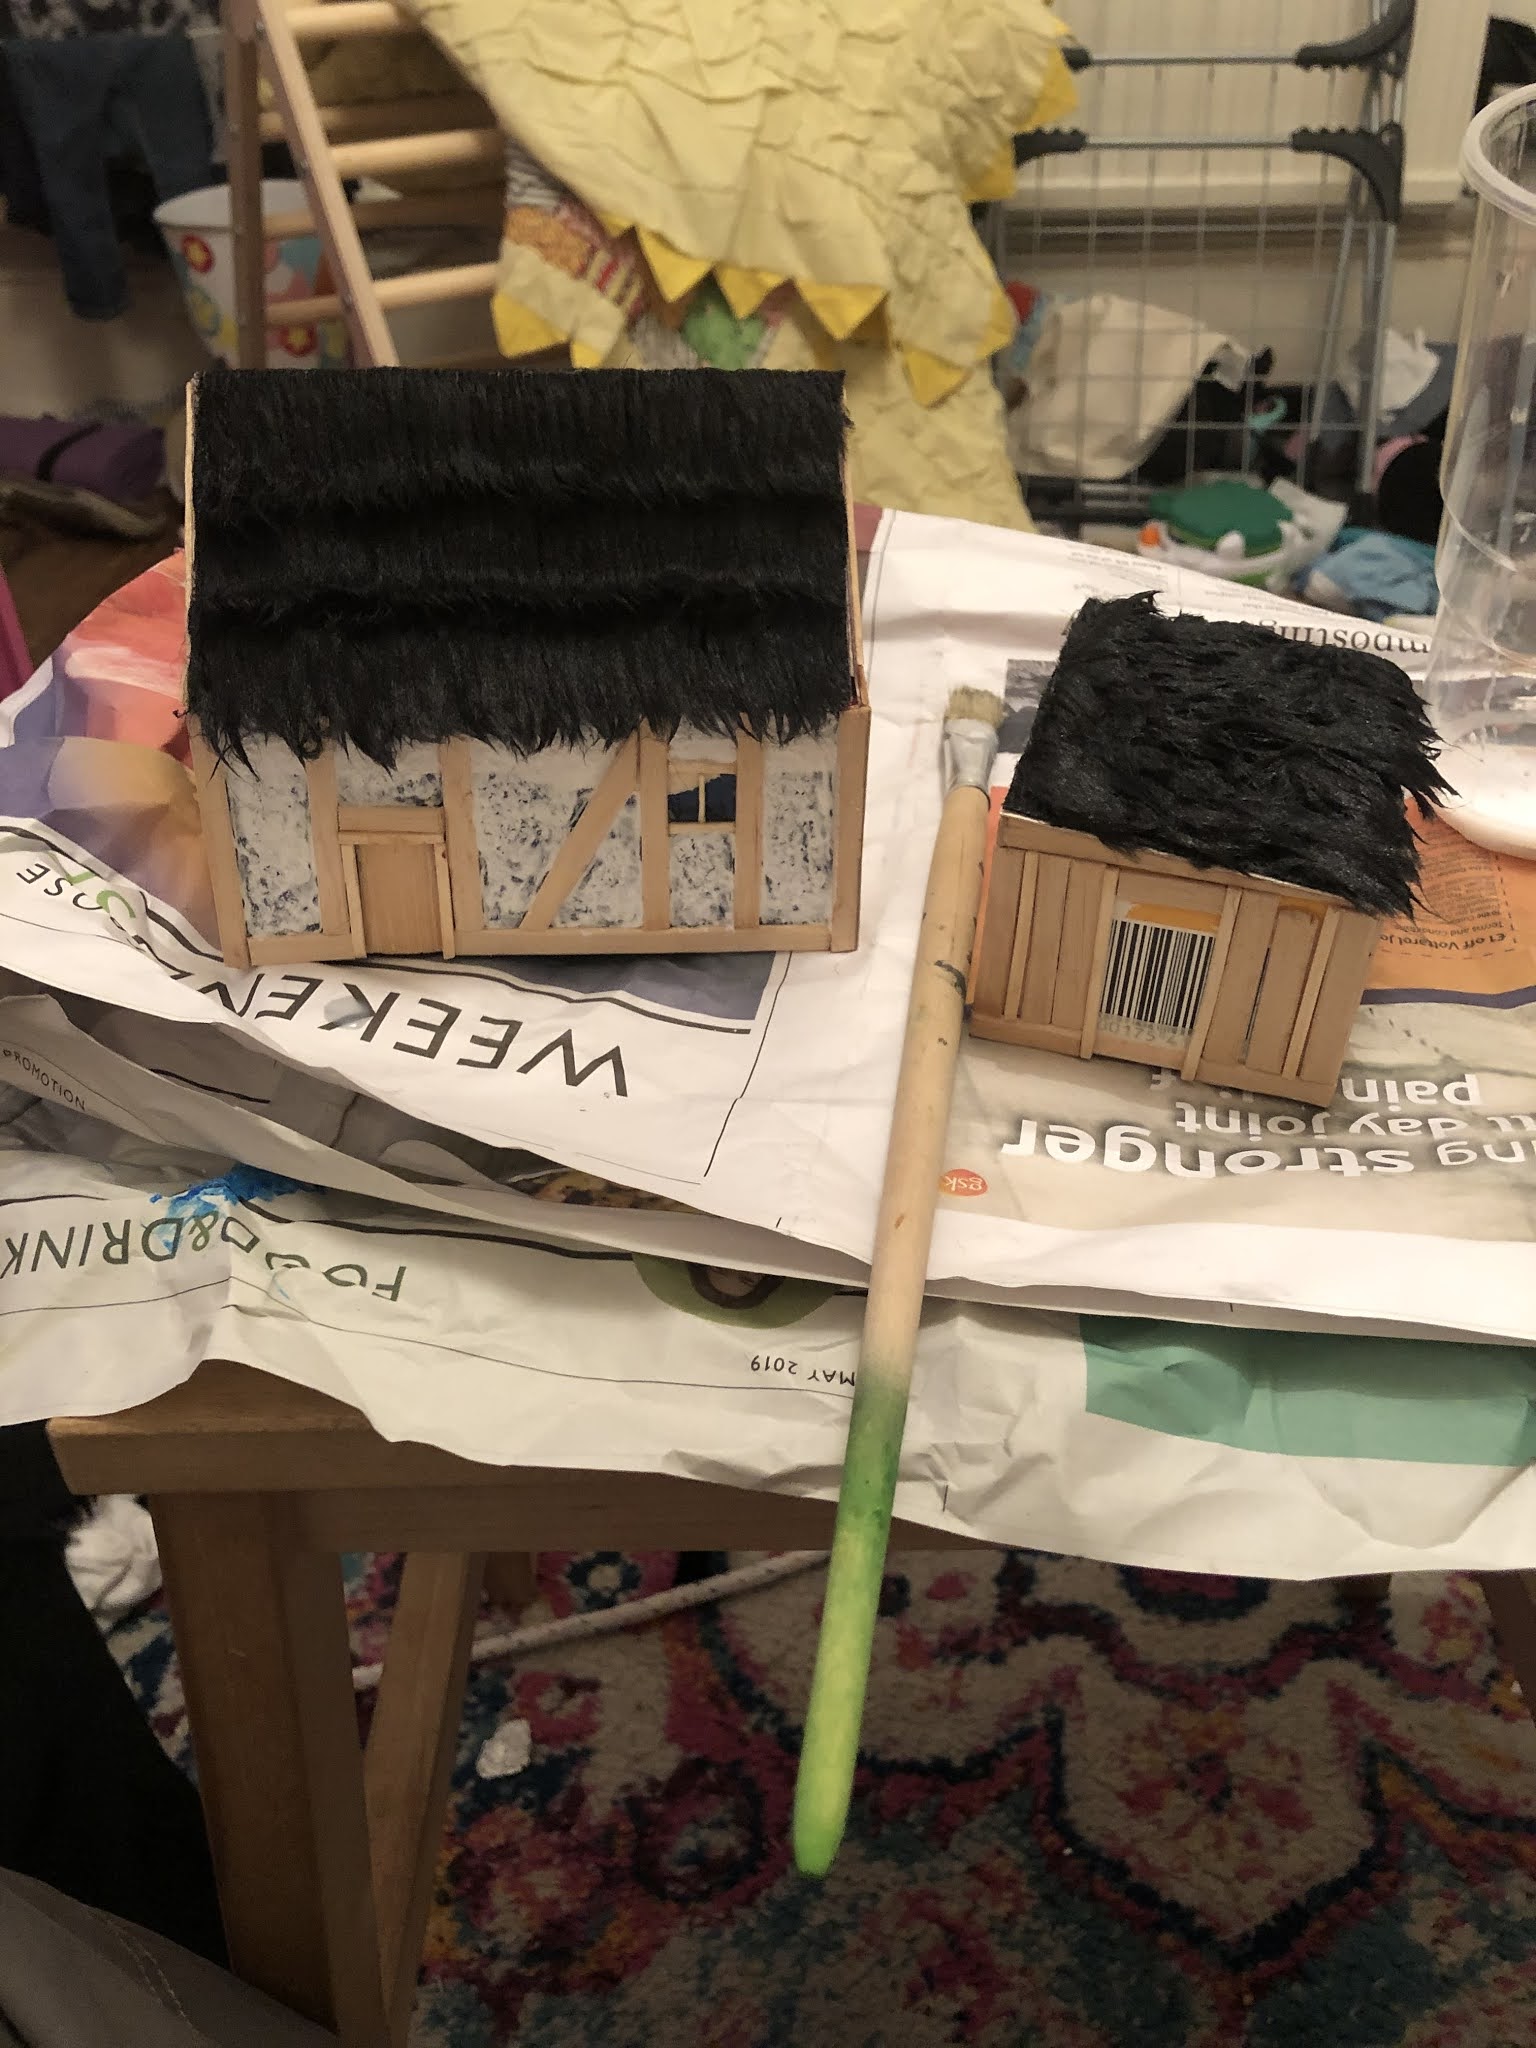
Then came painting! All the buildings (both homemade and Perry plastic) got a coat of poundland rattlecan black, and then the wood was drybrushed various shades of Wilko tester pot grey. The fences that came with the Perry house also got the same treatment, but it seems I didn't take any pictures of that, so you'll have to believe me when I tell you that they did, and then were finished off with more drybrushing, this time with much more expensive GW paints. The walls themselves got a coat of a creamy coloured Wilko tester pot, that didn't cover particularly well with a single coat, but that actually added to the effect I think!


The shack on the other hand got plenty of drybrushing in brown and tan to bring out the texture in the wood, before the thatch getting similar treatment from tan up to cream.

Then it was just a case of adding some Vallejo smoke to dirty up the walls and make them look lived in, and they were finished:


(the hanging curtain in place of a door on the shack was inspired by flicking through my copy of 'How to make Wargames Terrain', and was a dried out and cut down baby wipe glued into place, shaped and then soaked in watered down PVA).
Excitingly, this is the first thing this year that lets me cross something off of the Challenge:
- Finish something old
Finish a piece of terrain- Prep all of the monkeys in the monkey box
- Paint all of the miniatures in a boxed game
- Play a board game with fully painted miniatures
- Finish a complete skirmish force for a project (at least 16 miniatures, unless it's for a much smaller scale game like Batman)
- Repaint something (either a miniature that I have previously painted, or one that was received painted
- Convert a miniature and show WIP pic
- Finish the last member of the Nextwave team
- Complete the classes project (potentially adding the races from the Players Handbook to the mix)
- Add at least 4 entries to the Monstrous Alphabet Project
- Average at least a miniature a week by the end of the year (so, paint 52 miniatures)
- End the year with the Tally in the positive!
So, where next? While I've got a couple of ruined buildings that my DM gave me a while back that could step in to bulk up these one, I've got an idea for a relatively quick (famous last words) build that would also amuse me, so I'll se how far I get with that. I need some foliage, and since the second scenario requires trees, I might as well make some now to use in the first scenario too, which will reduce the workload needed before I can play the second scenario too! I'd also like to make some scatter terrain for a bit of character too, like a cart, well and woodpile, as well as needing to paint some of the ubiquitous wargames crates and barrels that conveniently get left in places that block line of sight and make for a more tactical experience than brawling in an open field.
So, things to do, in no particular order:
- Mystery additional structure
- Bushes
- Trees
- Cart
- Well
- Woodpile
- Crates and barrels
- a playing surface!
Plus, my wife and I watched Hamilton last week, so I've been hungrily perusing the Perry American War of Independence range, fighting the urge to start yet another project when this one is actually getting to the point where I might be able to play a game!
They came out great! And also super flexible for whatever games you flutter to next!
ReplyDeleteThese look great!. You have definitely inspired me to try making a few.
ReplyDeleteWowwy wow wow! Those are awesome!
ReplyDelete