
Like most wargamers, I have a habit of finding treasure in trash, literally - I have a box of interestingly shaped packaging; rolls of corrugated cardboard; even a sack of chunks of polystyrene secreted in the loft in case of terrain building inspiration. It's gotten to the point where my wife uses it against me - I came home one day and found that my wife had eaten a pack of delicious macarons without saving me any; her response: 'I saved you the packaging they came in!' - and admittedly, that packaging is currently sat downstairs on my desk as it looks like it would make some nice free standing motor or engine type scenery once decorated with suitable gubbins so I think her distraction tactic might have worked...
Inspiration struck once more when my daughter ate a tiny sandwich, leaving me this interestingly shaped piece of plastic:

Having been playing a lot of Fallout 4 recently, it struck me that it would make a nice storage shed of some kind, suitably weathered. So, off came the lid, and I drew on a rough outline for where I'd build a door:

Having previously had issues with the structural integrity of scenery made from hollow plastic, I thought I'd give papier mache a try this time:

In the next picture you can also see the door that I made from scrap card and aparrently forgot to take any more pictures of. I cut out the marked frame, and stuck my door behind it so that it would look slightly inset, giving the illusion of depth.

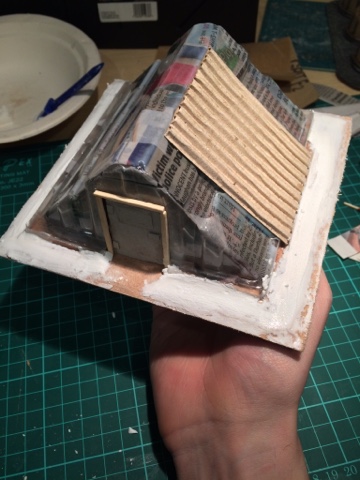
I also cut a sheet of corrugated card to cover the flat area on the side of the sandwich packaging that looked a little incongruous. Then, it was just a case of gluing and clamping the piece to a prepared base:

In hindsight, I'm not sure if the papier mache was fully dry when I got to this point, but hey, it's too late to go back and fix now...
I also made a door frame out of cut down matchsticks:

Learning from previous experience, I remembered not to skip this step - blending the edges of the piece into the base with filler. I left a path to the door mostly clear, and blended in the lower corners of the door, so that it would look like an area trampled down by repeated use.
As those of you who follow me on Instagram will have seen, I picked up a variety of supplies (at a pound a piece, no less) to experiment with for terrain making:

Rather than using my expensive modelling sand, I'm using bird sand from the Pets section of Wilkos. It looks great, but has some larger shell-like shards that I'm not a fan of, but unfortunately fit straight through the mesh of my kitchen sieve - May be more of a winner if I can find a finer mesh...

Then comes a large passage of time between pictures. We closed down a bookshop at work, which was a busy week but left me with this inspirational image should I ever get round to building some rubble piles:

And then apparently I was really bad at taking WIP pictures, and so here it is fully painted:

The Pound Land silver spray that I used came out much more matte than I had expected, and almost seemed to repel paint, so lots of washes and scrubbing on scrappy weathering ensued:

(despite what it looks like in the oddly-angled above image, the streak does actually look like it's following a path set by gravity in real life!)

Hmm, reviewing this image makes me think maybe I could have gone further with the rust effects, it looks a lot oranger in real life...

And of course, a posed shot with my trusty shotgun wielding Vault dweller!
And for those of you wondering about the viability of using Wilkos tester pots for painting terrain rather than expensive model paints, well it didn't go very well. The paint consistency was weird (after the first coat, it seemed to have slipped off of the top of the sand somewhat) and really didn't drybrush well. In the end, I gave it a final drybrush with Tyrant Skull, and chalked it up to a learning experience:

2017 Challenges:
- Finish 5 miniatures from my WIP drawer before starting anything new (0/5)
- Finish 10 miniatures from my WIP drawer before starting anything new (0/10)
- Finish 15 miniatures from my WIP drawer before starting anything new (0/15)
- Finish something years old
- Finish something SUPER old (as in, pre-blog old)
- Finish a piece of terrain x2
- Empty out my stripping pot
- Paint something from the stripping pot
- Prep all of the monkeys in the monkey box
- Build a wargames board
- Paint all of the miniatures in a boxed game
- Open Star Wars Imperial Assault and paint all the miniatures from it
- Paint all the miniatures needed to replace the tokens in the Imperial Assault Core Game
- Paint a complete box of miniatures (either a full regiment or starter)
- Finish a complete skirmish force for a project (at least 16 miniatures, unless it's for a much smaller scale game like Batman)
- Repaint something (either a miniature that I have previously painted, or one that was received painted)
You might notice that I've also added a couple of challenges (about completing old miniatures) mostly because the Timehop app keeps reminding me just how long it has been since I started various miniatures that I still haven't painted!
On the Challenges front, I'm determined to finish the third piece of terrain previously alluded to (that I also realise you can see in the background of some of these pictures) so that I can clear my desk off before moving onto other Challenges - it's fairly small, so hopefully it shouldn't take too long! Then, I'm going to try and crack out the '15 miniature from the queue' challenge, but it's going to be difficult given how many ideas I've had for various projects recently!
There has also been movement on the Tally front (inevitably, it might seem, given the length of time between blog posts), but not in the direction you might assume - Uncle Johnny mentioned that he wished he had some of the old, hunch-backed Chaos Warriors, as he felt like the newer style ones wouldn't fit in with the rest of his Chaos miniatures, and, having a rummage, it turned out I had 30 of them! So, off they went to their new home, in the vain hopes that they'll see the field of battle again (although John and I have managed one solitary game of Warhammer in the last decade, and both now have more children and less free time between us than we did back then, but I live in hope...)

Tally:
1 vs -16 = +15
In other news, I decided that I was going to sit down and crack on with working on the Star Wars/LOTOW adaptation that I was working on, as I think given how great Rogue One was this might be the year that I actually finish some Star Wars miniatures; I spent an evening trying to reverse engineer how I'd come up with the points total for a Stormtrooper in my existing notes, wrote a list of things I had miniatures for that I'd need to stat up, and then it was bedtime. The next night I got distracted and seem to have sketched out the basics of a ruleset for gaming Fallout, although I currently have a couple of options for dice mechanics that will need playtesting...
Well that's just ingenious, what a great build.
ReplyDeleteI can't wait to see prep all the monkeys in the monkey box!
ReplyDeleteNice build. Great use of trash, shame the tester pots didn't work out. The end product looks great tho.
ReplyDeleteLooks good dude.
ReplyDelete