Sunday, 25 December 2016

...and to all a good night!

As alluded to over on Instagram, I'd been working on something thematic to post for Christmas:


Pulp Santa!


Recently rereleased by Artizan Designs, I actually got this miniature when it was originally given away as a freebie for placing an order (5 years ago or so, I think?)


He hasn't photographed particularly well here (especially the snow!) but I'm fairly happy with how he turned out!

He was based on a 30mm DS base rather than a 25mm round, as I figured if he ever got used on the tabletop it would most likely be as a thematic festively themed random event with my zombies rather than anything else...


This miniature was also my first attempt at modelling snow - I dug out a pack of snow scatter that I picked up on the cheap at Salute a few years back and wanting a 'drifts of snow' kind of effect, mixed it with PVA to make a paste that I lathered onto select areas with a toothpick. When it dried though, it didn't look fresh and wet enough, and I was inspired by a conversation in the comments on Instagram to try giving it a coat of GW Ardcoat, which gave it a much more pleasing finish! I may have to pick up some of the new technical paint that GW have released for modelling snow bases to try out in the New Year though...

Finishing Santa takes the Tally to:

56 vs 342 = -286

Almost catching up on last year's number of completed miniatures, if I recall correctly...

Anyway, with all the festivities over the coming week, I'm unlikely to be posting anything now until the annual year-in-review post, so I'll take this opportunity to wish everyone a Merry Christmas and a Happy New Year!

Tuesday, 20 December 2016

Nananananananana Batman!

Way back when Knight models were first talking about doing a set of rules for gaming Batman on the tabletop, I had a Spanish-speaking friend translate the beta rules for me. They looked pretty interesting, and so around the time my daughter was born when they released the finished rule book I ordered one (also because by ordering when it was first released I got a Limited Edition Alfred miniature), and told myself that I'd paint up some proxies from my stash of Heroclix to try the rules out before investing in the boutique range of miniatures. Then I went to Salute and bought a ton of Knight Models miniatures in order to get a free Limited Edition Red Hood Joker, because that's the way the world works.

A short couple of years later, Pow! Here's that originally selected proxy Batman:


Wham! Including a shaky freehand Batman logo! I drew it in first with a soft pencil, because I am not good at freehand. I was briefly tempted to use the old school 'bat in a yellow oval that would literally paint a target onto the wearer's chest' but ended up going with a more modern black on grey.

It's not a bad sculpt for a Heroclix figure (which are generally fairly variable) - the musculature is nice, as is the drapery on the cape, although his eyes are a little squiff and took a couple of goes to get to a level I was happy with.


Zap! Bat-cape! I was originally planning on painting him with a black cape starkly edge-highlighted with a very dark blue, but got a bit carried away and ended up going for an overall dark blue cape, from a black basecoat up to Dark Reaper mixed with Caledor Blue (one of the good things about comic characters is that over the years there have been so many different costume variations that you're spoiled for choice when it comes to canon!)

[side note - I spent some time picking out the different bricks on his crumbling gargoyle base with various different coloured layers of paint and shades, and you can barely see it on the finished miniature]

Batman might hate guns, but he'll happily kick a mook while he's drawing a gun so that he shoots his own dick off it seems.

Finishing old tall dark and brooding brings the Tally to:

55 vs 342 = -287

Recently I've been thinking about making terrain a lot (in part due to infovore.tim posting stuff on instagram), but to do so I'd need to clear my hobby desk off of the hundreds of pots of paint currently cluttering it up, but if I did that I know I'd then end up wasting a bunch of time digging for the right paint to finish the half-finished miniatures also cluttering the desk up... I guess I need to set a line in the sand, choose the miniatures that I plan to finish in the next fortnight,and then clear the desk off to build terrain once they're done and dusted. However, realistically, I'd probably finish two of the miniatures, and then get an irresistable urge to start something else, and so the cycle continues...

Friday, 9 December 2016

Ragman

Another miniature finished, this time for the Batman project:


Ragman!

You know, Ragman:


No?


My road to Ragman is something of a convoluted one - I first saw this miniature way back in the misty days of the past in an issue of Inquest Gamer that had a full visual spoiler from the then brand new Heroclix set Collateral Damage (back in the day when physical media was still a thing that you could purchase) and, though it wasn't a character that I was familiar with, thought it was a pretty interesting and dynamic sculpt. Many, many years later, I ended up ordering one randomly whilst picking up some other bits and bobs from Blue Rat Games with the vague idea that maybe I could convert it into some sort of fantasy wraith.
Obviously, I stashed it and didn't get around to converting it.
For the last couple of years, I've been working my way through a backlist of Batman comics, in in-universe order, starting with Year One, and this year I hit some comics featuring Ragman. A guy with a murderous cloak of rags that makes him kill nazis (well, the Ragman from the era of comics that I've been reading, as opposed to the other that a quick google suggests also exist), although he struggles against it, that I already own an interesting miniature of? Consider me sold!


So, a-painting we did go!


This is a difficult miniature to photograph, given it's dynamic pose...


The angle where you can actually see the rags of DC's 'Tatterdemalian of Justice', each of which is the captured soul of an evildoer. Except for here, where it's just a random daub of paint, which was oddly therapeutic to do...


My original idea was to give the body a wash to grubby it up a little, but I ended up not doing this as I liked how bright some of the colours were in contrast to the rest of the model...

Tally

54 vs 342 = -288

I've dug a random assortment of half-finished bits and bobs out of the painting queue, so we may even see another post or two before the regular end of year post!

In other news, apparently this little corner of the internet hit over 100,000 page views at some point in the last fortnight - even if only 6 of them are real people that have found my stuff and liked what they saw, that's okay with me!

Saturday, 3 December 2016

Danger Vault Dweller!

Whilst painting up my Vault Dweller recently, I also painted this 50's style robot from Black Cat Bases:


Having just gone on their site to put that link in, it looks like he might not be available any more. He's more Forbidden Planet than Fallout admittedly, but I think the style fits. 

I bought this miniature innumerable years ago, so long ago in fact that I think Black Cat Bases actually disappeared off the radar for a while and have since come back...


It's a bit of a rough sculpt, but a metric ton of sponge weathering and judicious application of the GW Technical paint Typhus Corrosion in key spots make it look alright I think? The port in his back came with an optional key, which was a fun option but not for me...

Tally:

53 vs 342 = -289

Friday, 2 December 2016

A wanderer, a survivor...


My daughter's new bedtime routine has occasionally afforded me a little bit of painting time recently, which has allowed me to finish off this chap that you might remember from my previous post:


As you can see, I added a couple of pieces of shoulder armour to the conversion to make it look more like the armoured vault suit:


(although I'll settle for 'inspired by' rather than trying to be a direct copy of it). 
The little piece of leather padding on the right shoulder was probably the part of this miniature that took the longest - I just couldn't seem to get a finish that I liked on it, and so wound up repainting it several times...
I was half-tempted to paint the body of the shotgun green to break up the expanse of gunmetal, but ended up settling for a wholly silver body as per the in-game model it was inspired by.


I painted this survivor as having come from Vault 172 - technically non-canon, as there were officially only 122 Vaults constructed by Vault-Tec, but the number has a certain significance to me, so on it goes!


A closer view of the helmet - weathering is just great fun to do! I painted all of his equipment to look dirty, covered in chips and dings, so that it would look lived in and well-worn, from the scratches in his leather equipment to the layer of dust and grime on his vault suit.


And here's a better view of everyone's favourite post-apocalyptic fashion accesory, the Pip-Boy!


This was another miniature of firsts for me: my first time ever painting stubble on a miniature! I guess years of White Dwarf painting tutorials have finally come in handy, as I carefully glazed the beardy bits of his face with a mixture of grey and flesh...


And finally, a size comparison shot with the power armoured chap I previously posted.

Finishing him brings the Tally to:

52 vs 342 = -290

Taking my yearly rate up the the baseline acceptable level of an average of at least on miniature painted a week!

There was also another miniature that I was painting alongside this one that wasn't quite finished tonight, so who knows, we might even get two blog posts in one week for the first time in a little while...

Monday, 7 November 2016

Fallout Boy conversion wip


I know, the actual mascot is called Vault Boy, and it annoys a friend of mine when people refer to him as Fallout Boy, but that's the sort of awful, lazy wordplay that I can only assume keeps you coming back here (I'll see if I can work in an Atom and his Package reference next time to raise my indie cool points score back up)


Some time ago (back in the hazy days of early 2014) I decided to replay Fallout 3, as my original save had been lost in an unfortunate Xbox 360 crash, and I think the initial Fallout 4 rumours had started leaking out. As tends to be the case, I was inspired to dig out my knives and files:


When I started the conversion, my character in the game was scrappily armed with a combat shotgun and some rather sparse scavenged armour, and so this was my inspiration. A Crooked Dice minion was my starting point, as I figured that it's weird raygun looking weapon would be a good starting point for building a Combat Shotgun:


So, I cut of some extraneous bits to leave the body of the gun, which I planned to build on:


It did not go particularly well. I tried a variety of bits and bobs (both from cut up miniature weapons and miscellaneous other sundry materials) and nothing seemed to quite look right - the stock from a rifle was much too skinny, every donor drum magazine just looked wrong... So off came the lot, left hand and all, under the assumption that I'd be able to find a suitable combat shotgun as a whole:


And that was really as far as I got, way back in January 2014...

(Well, truthfully I also crudely fashioned some straps and a knee pad out of some green stuff and part of a heroclix riot cop, but that step was sadly not documented in picture form anywhere that I could find...)

And so, into a baggie went the pieces, to await me being able to find a combat shotgun that looked enough like the one from Fallout to satisfy my nerd OCD - the drum magazine was the main sticking point for me.

I kept playing Fallout 3, but very soon found a suit of power armour, and so from that point on my character never looked like my planned conversion again. Regardless, I kept the idea for it squirreled away at the back of my mind...

[time passes - imagine a montage where clock hands spin, pages tear rapidly off of a calendar, a pair of cartoon squirrels are born, run around eating nuts, and age to the point where they are sat in a pair of tiny rocking chairs]

Then, idly browsing the internet, I found a suitable donor - one of Heresy's trenchcoat gangers had a likely looking weapon:

So, I tweeted Andy at Heresy to ask if they were available seperately, and he told me that it was something he'd been meaning to get round to, but had been unable to with being so busy with his kickstarter. I asked him again at Salute, and Andy told me that he still hadn't had a chance, and suggested that it was probably worth just buying the figure and cleaning it up myself, so I did!


It's a little large (as Heresy tend to run on the larger side of the scale and Crooked Dice tend to run slender), but the only one of it's type that I was happy with!

With some careful cutting and filing, I was able to remove the arm and hand, leaving the shaped gun butt. Unfortunately, given the position of the arms on the receiving miniature, it didn't fit with the gun butt, so off that came too:


Then began the painstaking, repetitive process of filing and dry fitting to get a result that I was happy with:


I found a donor hand from a Perry miniatures set (the same piece as I used for my Eddard Stark conversion) to gave him a left hand resting casually on his weapon, and then I pinned everything to within an inch of it's life.

Then came the other essential identifier for the character - the Pip-Boy! As with my previous Pip-Boy equipped model, I carefully cut out squares of Green Stuff on my thumbnail, and then cut and shaped them using a variety of clay shapers, knife, and a pin liberated from my wife's craft room until I had this:


A Crooked Dice head sprue provided a hard hat wearing head to finish off the ramshackle look of the low-level Fallout character, although I wasn't sure about it at first, and spent some time googling pictures of  hats from the Fallout series. Nothing seemed to amuse me quite so much as the hard hat though, the sort of thing that you wear when you're desperate for any point of damage resistance that you can get! Plus, when it comes to painting, it should be fun playing around with weathering to make it look suitably scrappy!


Which leaves me with this chap awaiting some basing - I enjoy how the pose turned out: so calm, composed, in control; completely at odds with how I actually played the game, manically running head on at threats and using VATS to shoot them in the face (as opposed to shooters like Halo, where the general tactic is to run backwards away from the threat shooting it, occasionally hiding in a room that is extremely far away from any threat in order to wait for your shield to recharge).

Taking a short break from writing this post to fill the gaps in the base, I was suddenly struck with an idea: 'how hard would it be to add some more ramshackle armour, like a shoulderpad?'

Hopefully it takes less time to paint him than it did to finish the conversion...

Sunday, 23 October 2016

Zomtober Bonus Post - The Others

Despite the expectation stated in my previous post that I wouldn't get a chance to finish anything else this Zomtober, between my wife being at work and my daughter having the mother of all naps I managed to paint these three from start to finish yesterday:


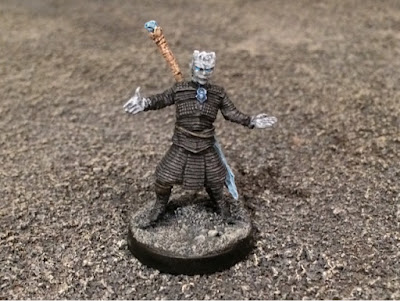
A set of three 'Draugr' from Elladan miniatures that are coincidentally the spitting image of the White Walkers from the Game of Thrones television series.


This is potentially the first horse I have ever painted, and it was actually pretty fun (although not every future horse that I paint will have hanging ribbons of flesh and exposed bone to pick out, so I don't know if that will affect my enjoyment).


The chain is a fun touch too, although in hindsight I wish that I'd soaked it in a dirty wash before attaching it so that it wasn't so shiny - I only thought this after having already glued one end of it inplace sadly, and it was a bit fiddly trying to apply Vallejo Smoke to the hanging chain in situ). Maybe I'll go back an try and give it a bit of a drybrush with a dark brown...


The sculpts were pretty straightforward to paint, hence me being able to finish them in a single day - their armour, which is the majority of the surface area of two of the three, was simply drybrushed with grey, then again with a medium silver, before being washed with black, to give an unnatural, unusual finish that I felt suited the alien nature of the Others. I think the Others are to Game of Thrones what Elves are to other fantasy settings - humanoid, but totally alien in their design and desires; inscrutable in their objectives (which will turn out to be nothing like the original assumption of them,meeting based on human logic and ideas).

(Don't worry, I went back and fixed that shiny spot on his shoulder just after taking these pictures)

(Ugh, I need to go back and tidy up just under his eye don't I)

Everything else was quickly layered up or washed and then highlighted, until they were done!


The ice weapons were probably the things that took the most time, as I ended up almost completely repainting them when my initial plan for them resulted in the looking too grey, so I glazed them back down with a couple of coats of Ice Blue and then worked them back up from there (this picture makes the white highlight look a little dull - the picture of the previous chap's sword is closer to true).


Finishing these three chaps brings the Tally to:

51 vs 342 = -291

Now that this little mini-project is over for now (although there's always scope to add a couple more Wights to bulk out the horde if it happens to take my fancy - plus, I need to make some Wildlings and Night's Watch for themto terrorise, but that means waiting for plastic Frostgrave barbarians and getting some old LOTR rangers respectively), what to do next? There are the Star Wars thugs that were bumped down the painting queue for Zomtober, but knowing myself as I do it's more likely that I'll grab a single miniature as something of a palette cleanser (and also to take the completed figures this year to 52), the only question is will it be something half done to clear space in the trays or something new? For the last couple of weeks, I've had a sudden hankering for the Horus Heresy, and then they announced Prospero Burns, so maybe I'll kitbash something to scratch that itch... Then again, I'm sure I've got a Santa somewhere I could prep ready for Christmas, but oh wait I'm sure I undercoated the War Doctor...

Saturday, 22 October 2016

Zomtober week 3-5 - 'skinny Wights'


So, this is my submission for week 3, 4, and potentially 5 of Zomtober 2016 (as we're off to Germany next week, so I'm unlikely to be able to get anything else finished and posted in time):


What I've come to refer to as 'skinny Wights' -  a mixture of Mantic, Perry and Frostgrave bits to make some more dessicated wights to supplement the batch I previously completed, inspired by images like this:


Although I'll admit, the skeletal pup isn't entirely in keeping with the original idea, but it was such a cool little piece that I just couldn't resist...

Especially fun was getting to play with weathering on these miniatures, which isn't something I'd really done much of previously. Enjoy, a selection of some of the shields that got a little extra detail before being weathered to within an inch of their lives:


(if you follow me on Instagram you'll recall the trials and tribulations I went through finding where past me had stored my transfer sheets, only to then mostly obscure them with weathering. Eh, c'est la vie!)


Most importantly, they seem to mix fairly well with the other Wights I've painted, and the slight scale and style discrepancy between the two sets isn't overly jarring, as the 'skinny' wights are meant to look thinner than their more recently deceased comrades!


Completing these takes the Tally to:

48 vs 342 = -294

Only 4 away from hitting an average of one miniature a week for the year, and only 11 away from catching up to last year's total.

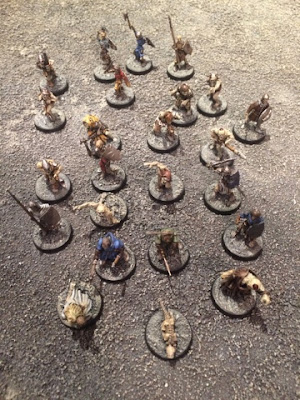
And so here they are based for mass battle:


If I paint their icy leaders, I think I could probably knock together another couple of Wights using left over bits from the Mantic sprues and some Perry bits and then have enough miniatures to fill a fourth WOTR base (and then I'll go back and see about adding some dead grass and snow to all of their bases at the same time)


Monday, 10 October 2016

Zomtober week 2

'But you've missed the Sunday deadline' I hear you cry! 'And wait a minute, doesn't week two imply that there should have been a week one?' I hear you add, incredulously, reader voice in my head. Well yes, both of these points are true, in part because I had bigger plans for Zomtober this year, and also in part because I didn't actually refresh myself on the proper format of Zomober until the month had already started!

So, rather than my usual additions to the modern zombie project (that I should really get around to taking stock of one of these days), I thought I'd have a focused theme month of sorting out some wights for the A Song of Ice and Fire project, and here is the first batch completed:


A blister of Revenants from Gripping Beast bought at Salute a couple of years ago, they're a lovely little set of really characterful miniatures. Whilst not technically zombies, they're near enough I think that I can get away with it for Zomtober!


(excuse the weirdly lit pictures here, I think the light behind me fell over while I was taking these pictures)


I had great fun painting these, and spent a little extra time adding damage to the metals (adding little chips and dings, and picking out the occasional link on their rusted chainmail with a much lighter metal to give the appearance of really worn, damaged chainmail, in various states of disrepair) - when it came to time to paint the gore thought, it turns out that I apparently haven't painted a zombie in so long that my pot of Tamiya Clear Red has dried up...


and it turns out that the Games Workshop 'Blood for the Blood God' Technical paint doesn't behave quite the same when you try and mix up a much darker shade...


Ah well, I can always go back over it with TCR if I really hate how it looks after giving it a week!

Here they are based ready to be bolstered by some reinforcements for some mass battle action:


Reinforcements you say? A nice chap over on Instagram sent me a sprue of leftover Mantic skeleton bits so that I could make some more dessicated wights:


So the combination of finished miniatures and received bits leaves the Tally at:

36 vs 342 = -306


Once I've finished the next batch I'll go back over all of their bases and add some static grass, and maybe try adding some snow for the first time (I've had a pot of snow flock sat in my desk drawer for a while now but not got up the courage to try it, having seen so many articles on the various methods of doing snow bases - should I scatter it onto glue or mix it into a paste before applying?)

And in the meantime, here's a little preview of an accesory made for one of the next batch of wights (leaving me glad that my old press mould still works and hasn't been damaged in the move!)


(If I don't get round to finishing and posting the next batch, or the other batch planned for after that by the end of the month, which is entirely possible as we're off to Germany in a fortnight so that our daughter can meet her Great-Grandmother for the first time, pretend I split this post out over several weeks so it still counts for Zomtober, Okay?)