As part of the ongoing operation: play some Frostgrave, I knew I needed to make… well, some Frostgrave! These plans were expedited when down in the basement I picked up a Hirst arts ruin that a friend gave me a few years back and it broke in my hands, so I decided to rebase some parts separately to allow for more modularity.
So this:
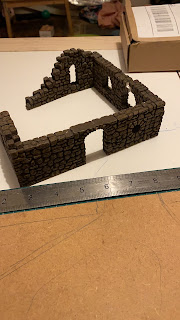
Became this:

I did briefly consider basing the ruins so that the outside edge of the wall was flush against the base to allow me the option to maybe make some rubble that would sit right up against the wall, but in the end decided to base everything centrally so they’ll match the rest of my existing scenery.

I did carefully set the bases so that if need be they can still be aligned in their original arrangement:

Although I did play around and see how they looked wildly mixing and matching the various pieces.
To supplement these, I decided to make some quick and easy walls that I’d been thinking about for quite some time, using cork mats:

These were from IKEA, I believe - whilst foam might be the go-to material for most modellers, I’m a huge fan of cork (I blame Matakishi and their tea house) and thought I could make a serviceable set of ruins using these. So I set about cutting and tearing some rough wall shapes using a handy Frostgrave thug as a scale guide. I knew I wanted a door in one piece, so used a base to ensure I had a symmetrical curve:

The good thing about ruins is even the wonkiest offcut can make a passable bit of scenery!

Back to my wall with a doorway:


I then cut more bricks and haphazardly arranged them on all of my walls for some additional detail. And yes, I did shave some down thinner to give a bit of variety of depth to the walls.


I’m going to be in real trouble when I finally run out of it! I thinks it’s particleboard, but honestly don’t know enough about wood to be confident in that claim…
I measured out each wall piece onto their cut strip, trimmed it down and bevelled away, first with my knife, then going over it with a big file to smooth it out and allow the pieces to hopefully sit more naturally on the table.


Having trimmed some of the bases down to fit the lengths of wall, I found myself with some odd short lengths of base left. Rather than saving these for a rainy day or letting them go to waste, I made a few shorter pieces, including this fallen column made using a cork:

And this odd bit with the curved edge of the mat used because I thought it might look like some sort of ruined column and add a bit of visual interest:

Although the majority of the pieces I made were straight lengths of wall to try and throw down some blocking terrain rather than necessarily being concerned with modelling realistic ruined buildings, one of the pieces I made was a corner ruin, so I spent some time smoothing out the joint where the two walls met with some filler:

Then it was time for glue and sand on the bases:

And then undercoating. I decided to try a mix of mod podge and black paint, as cork really needs sealing with something before you paint it if you’re planning on drybrushing it (hard won experience - it’s very frustrating if you knock off a little chunk to reveal the orange cork underneath!) and I’d seen this method recommended in a few YouTube videos.

It seemed to work, but there were some issues with knocking some of the sand off of the base as the mod podge seemed to be drying and getting tacky as I was applying it, but not so terribly that I needed to start from scratch.
At this point, all of the pieces then got a blast of Poundland grey primer in my specialist spray booth, an upturned archive box in the downstairs toilet with all of the windows open:

Just look at them, you could probably call them good and slap them down on a table at this point:

Never one to take the easy way out though, it was time for painting. I picked out the egg carton stones with a darker grey, before giving everything a coat of homemade Vallejo Smoke equivalent wash.

As you can see in the above picture, I added slightly more than just a drop of washing up liquid to break the surface tension, resulting in a very bubbly wash. The first application to a piece revealed that it was not in fact dilute enough, and pretty much just painted the piece brown, so I scrubbed that off and added some more water to the mix. When I painted it on it looked fine:

(If a little bubbly)
But as it dried, it looked like I hadn’t actually applied any at all:

So I had to go back over every piece multiple times trying to get the effect that I wanted. It wasn’t as quick as I’d originally envisioned, but I pretty much got them where I wanted after the fourth or fifth application (having carefully added just a tiny smidge more pigment).
Then it was a case of attacking it with a Drybrush of my usual selection of Wilko tester paint pots and now we have enough ruined walls to fill a little table:

At some point in the future I think I’d like to make some taller multi-storey ruins, but for now these will be perfect for the ruined basements needed for the solo campaign Dark Alchemy.